
Have you ever heard of Shower Jelly? Today I want to show you how easy it is to make shower jelly yourself and what to look for. It will change your shower experience forever!
Got up on the wrong side of the bed? In the future, nothing can spoil your start to the day. Shower Jelly is the magic word that puts you in a good mood.
That sounds too good? Almost like a bubble bath? Is the hype around a Jell-O shower gel exaggerated? Never. Ever since I got my first shower jelly, I can't get away from the little slippery shower buddies.
Because even adults are allowed to take huge bubble baths (including fake foam crowns and beards) and prefer shower jelly to dull shower gel.
Sometimes it's the little things that brighten up the start of the day or the end of the day. The basic principle is quite simple: you mix gelatin, shower gel and essential oils together.
Table of contents
What are shower jellies?
Translated, jelly means nothing other than jelly. In the kitchen it is often associated with pudding, jelly and jam. Shower Jelly, however, is not something you can eat. It is a personal care product that looks and feels like a jelly. When you shower, you rub it against your wet skin, giving you a shower gel and a shower sponge at the same time.
Kids love dissolving little jellies in the bathtub. And I love the gooey consistency in the tub and shower - you could say it's the softest shower in the world. :)
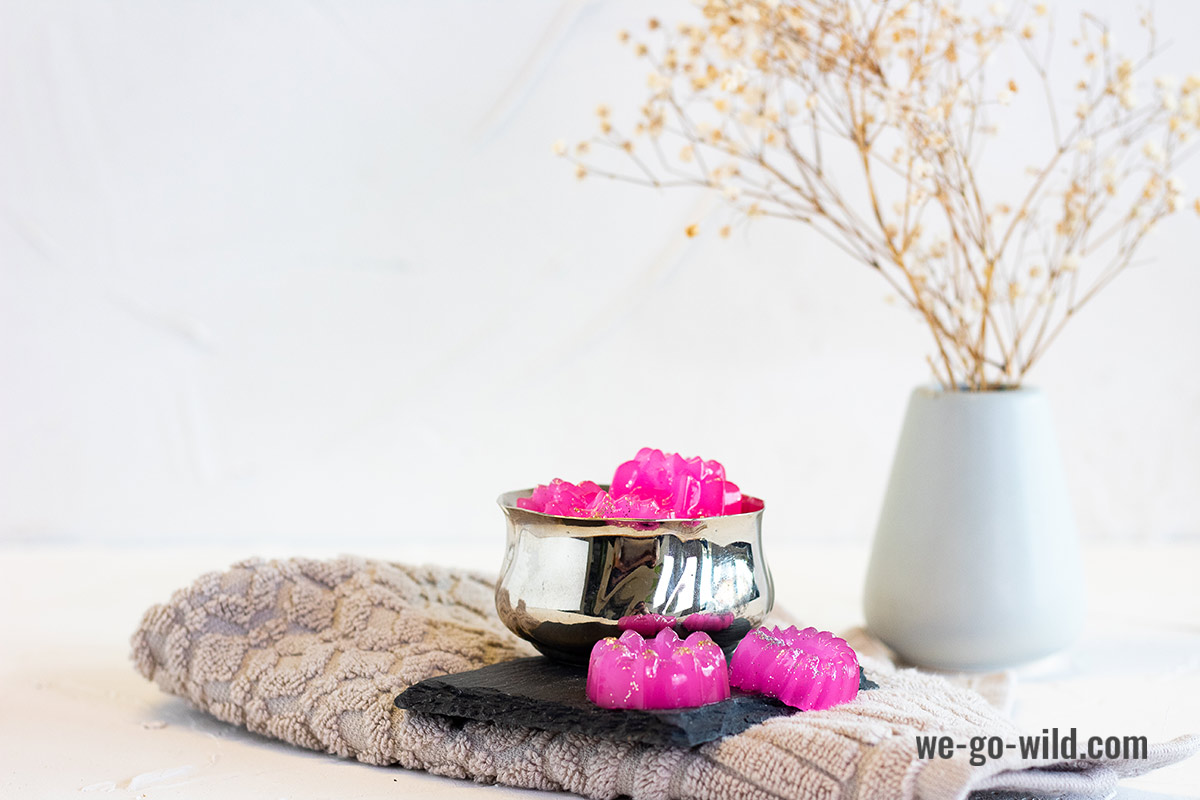
The little wobbly shower buddies are eye-catching and make a great DIY gift.
What ingredients do I need to make shower jellies myself?
Good news for all who are not the big DIY makers now. I have the Make shower jelly yourself mastered brilliantly. And although I'm always fully motivated for such projects, it doesn't always work out the way I imagine.
This time, however, it worked on the first try.
Before I show you the instructions, I want to tell you what ingredients you need. And how you can substitute certain ingredients if you don't have them on hand.
Gelatine
Gelatin is what holds the jellies together and makes their consistency Jell-O-like. You can use sheet or gelatin powder.
If you don't want to use gelatin at all, I have another vegan alternative recipe with Agar agar* in stock. Making your own shower jelly without gelatine works just as well and makes no difference to the consistency.
It is important that you use both gelatin and Agar agar* dissolve very well in water so that the jellies are nice and even.
Shower gel
If you want to make shower jelly yourself, you have a free hand when it comes to scent. If you're making the slippery shower buddies for friends, find out which shower gel and scent they particularly like.
For the jellies in the photo I used a shower gel with vanilla scent and refined it. I take a gel that is suitable for sensitive skin and does not contain artificial additives - very many dry out the skin namely enormously.
Fragrance
If you regularly make natural cosmetics, you certainly have a whole load of essential fragrances in your craft cupboard. What smells good to you and makes you feel good is allowed.
When using shower gel with fragrance, make sure that the scents are compatible with each other. A gel with strawberry scent and essential lavender scent - that's not a combination you need.
When it comes to fragrances, the basic rule is that if you're not that familiar with them, you should combine no more than two scents.
Paint and glitter powder
Does not have to be both, makes the shower jello, but first personal and sweet to look at. For both ingredients, the rule is: less is more! Who too much color and Glitter* will be annoyed later. Because you first have to get it off your skin again.
Use Food coloring* or Soap color* to color the jellies.
Chocolate mold or muffin tin
If you want to make the jellies, you will need a mold. The base itself is very liquid and needs to cool in it to solidify. You can buy soap molds, use muffin molds, or even reuse chocolate molds if you want tiny jellies. Ice cube molds also make good molds.
With muffin molds, it is easiest if they are made of silicone, from which they are best released. I do not recommend steel molds - the jellies can not be removed from the mold without damage.
So you can make your own shower gel!

Tip: In the book, The Glow - Naturkosmetik selber machen, you will find many great instructions for DIY cosmetic projects. From creams, shampoos, scrubs, oils, you will find many step-by-step instructions with photos.
When I started to look into the subject, I stumbled across this book. It offers a lot of great instructions for beginners and also advanced. And for every skin and hair type. I can highly recommend it to you and regularly prepare natural cosmetics with the book myself.

How to make shower jelly yourself?
Here you will find a very detailed step-by-step tutorial. It is intended for all who have little experience with jellies and DIY cosmetics in general. At the end of the post you will find a short version of the instructions - ideal for those who have more experience.
These instructions make 12 shower jellies.
Material
- 12 leaves gelatin or 15 grams powder gelatin
- 100 ml water
- 1/2 tsp salt
- 150 ml shower gel
- 5 drops Food coloring*
- 5 drops of essential oils
- 1 TSP Glitter*
Also: newsprint, scale, bowl, Soap mold*, spoon
Preparation
Line the countertop with newspaper, this saves a lot of cleaning! Put the soap molds on it and then we can get started.
For gelatin sheets: Soak the gelatin in cold water and let it sit in it for 4 minutes. Squeeze it out with your hands. If you use gelatine powder, you can skip this step and start right away with the next one.
Dissolve the gelatin powder or soaked leaves in very hot water and stir with a tablespoon until they dissolve. If this doesn't happen, the water was too cold. Put your mix in the microwave for 15 seconds and stir firmly.
Add salt and shower gel. Stir well.
Now come Food coloring*essential oil and Glitter* added.
Those who wish can additionally add a little Glitter* Sprinkle with a teaspoon into the mold to give the jellies a glittery top.
Pour the liquid mixture into the prepared molds - if they are on newspaper, it matters little if you spill a little.
Set the finished jellies aside for about two hours to allow them to set. If you want to speed up the process, place the molds in the refrigerator.
And without gelatin?
Important: Agar agar* behaves a little differently to gelatine. It must first be boiled before the gelling process can begin. Gelling starts when it cools down. It is not enough to add the powder to lukewarm water or just warm water. The hotter, the better. That's why I boil the water in a kettle!
It may be that the vegan shower puddings become a bit more elastic and firm. Otherwise, however, there are no differences in the preparation.
This recipe also makes enough for 12 jellies.
Material
- 5 TSP Agar agar*
- 100 ml water
- 1/2 tsp salt
- 150 ml shower gel
- 5 drops Food coloring*
- 5 drops of essential oils
- 1 TSP Glitter*
Also: newsprint, scale, bowl, Soap mold*, spoon
Follow the steps as above, for the classic jellies. However, you now start right away with the Agar agar* Dissolve the powder in very hot water.
In 5 minutes to DIY Shampoo Bar

How to use Shower Jelly?
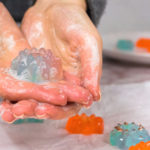
Wet the skin. For the application, take the whole jelly out of the package. Rub it on the skin, the shower jelly immediately begins to foam. Put it aside and you will have more than enough foam for showering.
The first time showering is already a little confusing. I for one broke a piece out of the jelly while trying to use it. Was the wrong decision in hindsight.
You have two options. If you used a relatively large mold, you can cut down the amount you need and take it to the shower.
Or you can take the whole shower jelly with you. Briefly hold under the water and then gently circle over the skin. The Shower Jelly melts a little and rewards you with a pleasant foam.
The shower experience will be especially refreshing if you put your shower jelly in the refrigerator beforehand.
So easy you can make bath additives yourself
How do I store shower jellies correctly?
You should store the jiggly shower gel in a sealable container. If you don't, the little shower jellies will soon be half their size and dry out.
If you have small tupperware, you could even make the jelly right in it, it makes the whole process much faster :)
Which fragrance suits me and my shower jelly?
There are so many essential oils out there and you can't decide which scent your shower gel should have? Maybe the decision will be easier for you if you read through this short personality test.
Type 1: Jumping out of bed doesn't exist for you. Saying goodbye to bed every morning is torture and you need a shower and coffee in the morning to be able to function.
Type 2: Are you a fan of evening showers? Wash off the day's dust in the evening and all your stress falls away.
Type 3: You like to do sports, but coming down and relaxing your muscles after a strenuous sports session is not so easy?
Okay, now please decide on a personality type ...
... Ready? Then we come to the resolution.
1. good morning world shower jelly make yourself
You definitely need a wake-up shower gel. Fresh lemon scents work great. The best thing to do is to mix a moisturizing shower gel (maybe one with Coconut oil*) with the fresh scents of citrus.
2. make stress way shower jelly
Essential oils can help to effectively relieve stress. Good essential oils for relaxation jelly would be ylang ylang, Rose oil* or Yasmin. Depending on your preference, you should choose one of these and select an odorless shower gel as a partner.
3. fitness jelly with cinnamon scent
Muscle-relieving and soothing, the shower jelly is said to be after sports. Perfect for this purpose is Cinnamon*oil. Not only does it smell fantastic, it also strengthens the nerves and relieves muscle tension.
And here as promised the short version for the instructions
Make shower jelly yourself

Du benötigst
- 12 Leaves Gelatine Alternative: 15 grams powder gelatin, 5 tsp agar agar
- 100 ml Water
- ½ TL Salt
- 150 ml Shower gel
- 5 Drop Food Colors
- 5 Drop essential oil
- 1 TL Glitter
Anleitung
- Soak the gelatin in water for 4 minutes. Squeeze it out and dissolve it in 100 ml of hot water.12 leaves gelatin
- If you have powder gelatin then just add the powder to 100 ml of hot water and stir.100 ml water
- Now add salt and shower gel. Stir.½ tsp. salt, 150 ml shower gel
- This is followed by food coloring and essential oil. Attention: Better use only 2-3 drops of food coloring!5 drops of essential oil, 5 drops of food coloring
- Put the gitzer into the jelly mold and pour ready mixture. Leave the jellies in the refrigerator for at least 2 hours.
My conclusion
Make shower jelly yourself create even DIY beginners. It is not difficult or complicated. Once you've tried it, you can experiment a lot more the next time. By the way, Shower Jelly is a great gift for a dear friend.
Have fun making it and good luck! :)


To browse further:
* Advertising & affiliate links: Our website is financed by advertising and affiliate links. As a partner of linked stores (e.g. Amazon) we earn from qualified sales.
Read more
